Thursday, April 30, 2009

Sheen, No Sheen, You Decide

Most of the time, people are looking for a sheen for their furniture.  Recently, we have had several people ask us how to decrease the sheen on their furniture!  Decreasing the sheen has a very easy solution . . . simple apply Briwax in the color of choice and don’t buff.  As we’ve said previously, you’ll know when Briwax is dry because it turns dull.

Even if you decide not to buff out Briwax, it is still important to apply the wax in light applications.

Remember, even after you buff your Briwax finish, a wax finish will always be a softer sheen than using a poly or plastic finish.

What is Briwax 2000?

Briwax 2000 USED to be the name for the Toluene Free formula of Briwax.  Remember in 1999/2000 when everything was named the catchy “2000″ to designate a new, exciting product?

Well, after many years, the “2000″ label became old and actually, dated.  Hence a few years ago, the official Briwax designations became Originaland TF or Toluene Free.  The designation “2000″ is NO longer used on any new cans distributed in the US - even though a retailer could possibly still have some stock of cans that read “Briwax 2000″.

So, if you’re looking for Briwax 2000 - you should now be looking forBriwax Toluene Free.

To learn more about the Original and Toluene Briwax, read further in our blog “Briwax is Available in Two Formulas”.

Briwax is the FINAL finish

Briwax can be used over almost every cured finish and Briwax is the FINAL finish.  Think of the Briwax finish as the protective finish for your furniture.  No other finish goes over Briwax.

Remember to use Briwax sparingly and to buff after each application.  You’ll never have any wax build-up and you’ll end up with a museum quality finish that will enahance and protect your furniture for years.

The Briwax Family of Fine Products

From time to time, we’ll introduce you to some of the other products that carries the fine Briwax family of products name - including:

Sheradale Wax, Liming Wax, Natural Creamed Beeswax, Danish Oil, Teak Oil, Marble Wax, Furniture Cleaner, Water-Based Wood Dyes, Shellac Sanding Sealer, Wax Filler Sticks, Touch-up Dye Pens . . .

How do I remove Briwax?

We’ve been asked the question:  How can I remove Briwax from my piece of furniture?  Briwax can be removed using mineral spirits (paint thinner). Just take a cloth, we prefer white so that you can see the wax, and dampen it with mineral spirits. Wipe the area where you wish to remove the wax and the petroleum distillate in the paint thinner will dissolve the wax and your cloth will remove it. Rinse out your cloth in the mineral spirits and repeat until the cloth shows no signs of wax. Let the mineral spirits evaporate before attempting any other procedures on the piece.

Thursday, April 9, 2009

How long will my Briwax finish resist a spill?

Envision waxed paper - when you put liquid on the waxed paper, it beads then within a few minutes, the liquid is absorbed into the waxed paper. Briwax will resist a liquid spill for about 20 minutes before the liquid is absorbed into the finish. Simply wipe off the spill and rewax, if necessary.

Briwax is Reversible . . .


briwax

What does that mean?

Technically Briwax is an evaporative finish, which means that every time you introduce a petroleum distillate (mineral spirits) to wax, you will dissolve the wax.

Nothing is harmed of course, but a lot of house maids panic when they think they have "ruined" the furniture by spraying a liquid polish such as Pledge over a waxed finish. Simply reapply Briwax again and the problem is solved.

Reversible also means that you can alter the subtle color that Briwax reflects.

For instance: You have a beautiful Mahogany piece that you believe is too "red". Apply Dark Brown Briwax to "tone-down" the red and the piece will appear more in the "Auburn" range of color. If you don't like this effect simply rewax with Antique Mahogany and the red of the piece will be highlighted again. You see, it's reversible! You may do this in ten minutes or ten years, it doesn't matter, it is always reversible.

Just What is Briwax?


briwax-can

  • Briwax is a blend of beeswax and carnauba wax.  An all natural product.
  • Beeswax is an excellent preservative, but relatively soft.
  • Carnauba wax is a much harder wax.  The combination of the two makes for a perfect finish on all surfaces.
  • The addition of various dye colors suspended in the wax allows Briwax to diminish minor scratches disappear without changing the character or color of the piece.
  • An inherent cleaning solvent in the wax is designed to clean grease and grime off the surface before it evaporates, leaving a waxed surface.  This thin film of wax prevents oils and salts (fingerprints) from harming the surface finish.
  • The possibilities for Briwax are endless.  Use it on wood, leather, marble, concrete, metal or properly cured painted surfaces.  The only surface NOT appropriate for Briwax is linoleum.  The original blend of carnauba wax for long lasting shine and beeswax for durability protects most finishes.
  • Simple to use, it leaves a beautiful finish that is easily maintained.
By the way, Briwax is pronounced BRI wax - long I - rhymes with my.  So, remember the jingle . . . My Wax, Briwax!

Did you know that Briwax comes in a 7-pound can?

Briwax is generally sold in a 16 oz. or 1-pound tin. This is the size container that is seen most frequently in your neighborhood hardware store, antique store or woodworking shop.

If you have a really big job or are in the finishing business, there is also a 7-pound can available. The 7-pound can looks very much like a one gallon paint can. This large can is also known as the Trade Size. Clear and all 9 wood tone colors of Briwax are available in both the one pound can and the 7-pound, Trade Size can.

briwax-cans

Coverage of Briwax

Many folks have asked us about the coverage they should get with Briwax. Here is a way to figure the coverage that you should get (note: everyone uses too much!).

Whatever you are about to use Briwax on, whatever kind of surface a simple rule to follow is this. If you put a high powered microscope on the surface and took a look in it, what you would see would look pretty much like a kitchen sponge. See the pores? That's where the Briwax is going to go.

A formula for figuring the amount of Briwax you will use in this case is the following:

200 sq. ft / pound of Briwax (appx. 85% of pores filled) 1st application.

400 sq. ft./pound of Briwax (appx. 95% of pores filled) 2nd application.

500 sq. ft./pound of Briwax (100% of pores filled) 3rd application.

  • Also, 400-500 sq. ft / pound will be your maintenance for the life of the piece.
  • Pine is the most difficult to wax to a beautiful sheen but is also the prettiest. Pine almost always has to be waxed 3-4 times to develop that lovely patina...but it is worth it!
  • Oak, Maple, Birch and other hardwoods will develop a sheen on the first or second application.

Now, say the surface you are about to wax has a varnish or paint on it. Look at the sponge the same way, only now mentally wrap it in a clear wrap (Glad, Saran etc.)

This is a way to visualize a "film finish" on any surface, be it varnish, paint, shellac, or lacquer. The film will keep the colored Briwax out of the pores so no wax will penetrate the film and you will get no color addition to the surface. Notice that if you have a scratch or a chip in the "film", Briwax will fill in the opening and repair it for you. Remember Briwax loves a rough surface and will always try to smooth it over.

The formula for figuring the amount of Briwax you will use in this case is the same as above, only go immediately to the 400-500 sq. ft. /pound. One application will be sufficient.

Heart Pine Cooktop Cover

img_9568

We wanted a cook top cover to provide more space on our counter top. The Kitchen Island was made from 250-year-old heart pine and was oiled and waxed with Briwax Tudor Brown. The island was installed eight years ago.

img_9532

img_9547

After making up the new “old” heart pine covers (using the same 250-year old heart pine) and ensuring the fit we sanded the top to 180 grit. You really can’t see the sanding scratches at 180 grit with the human eye. These scratches will also allow the wax finish to “hang on”. Briwax loves a rough surface and will fill in all the valleys left by the sanding process.

img_9549

The Kitchen Island was fairly dark so we applied Briwax Tudor Brown to fill in the open pores of the wood. We waxed with Tudor Brown and then buffed out to a sheen. We needed a little more red so we then waxed over the Tudor with Briwax Teak. After buffing out we thought this combination was matching perfectly.

img_9557

img_9561

img_9562

Here is the final product as it is installed on our kitchen island.

img_9565

The granite countertop is finished with Briwax Marble wax. Marble wax is all carnauba wax so it is much harder then the beeswax and carnauba wax blend of regular Briwax.

img_9567

This project took approximately 30 minutes from start to finish.

Teak Briwax on a Cherry Wood Corbel


We wanted to share with you this beautiful corbel made from Cherry wood. The corbel has been finished using one of the newer colors of Briwax, Teak, as the only finish. The rich red tones of the Teak Briwax are a perfect partner for the red tones of the cherry wood.


We wanted the wax to gather in the crevasses to create and accentuate the shadows of the carving.


Remember, Briwax was the only finish used on this corbel.

Our thanks to Osborne Wood for supplying us this beautiful corbel.

Can Briwax Remove White Water Rings or White Water Marks?

Yes. Well not really! Its the solvent in Briwax that removes white watermarks. White water rings or watermarks are caused by condensation of moisture directly into the finished surface of the wood, affecting the finish from the inside out. Most finishes are durable enough for only the top layer of finish to be affected.

Here's the analogy . . . remember when you last went to the doctor's office for a shot? The nurse took a cotton ball, dipped it in alcohol (a very fast evaporator) and rubbed your arm to sterilize it. What was happening was that the alcohol was evaporating the moisture from your skin, actually lifting it out, and sterilizing it at the same time.

Using Briwax to remove white watermarks works the same way. The solvent in Briwax is a fairly fast evaporator, 45-60 seconds when it is spread out. This quick evaporation process is lifting out the moisture from the watermark causing it to disappear.

The process can be speeded up by using 0000 steel wool. You should be careful though, many times we will rub too hard in our haste to remove the watermark and rub right through the finish. Be patient and work on half of the mark at a time. This way you will be able to see the watermark get lighter and lighter and know that you are progressing. Again, be patient!

Be sure to feather out the edges of the area where the white water rings or watermarks once was to blend with the entire finish. Once you have removed the water ring or watermark, use Briwax over the entire piece to renew the finish.

Remember:

Use Briwax sparingly. A little goes a long way.

Do not rub too hard - gently rub the area so that it will not become too smooth.

The solvent in Briwax is actually removing the white water ring, not the wax. The solvent is evaporating the condensation that has caused the white water ring or watermark.

If a ring or spot on your furniture has turned black, the condensation has gone through the finish has has affected the wood itself.

Using Briwax on Finished Wood

It is always a good idea to test Briwax in an inconspicuous area of a piece of furniture first. Try it on the underside of a table apron, inside of a drawer or the inside of a table leg. Your test spot can let you explore color compatibility, finish and sheen level. Work in small areas at a time. You don't need to worry about match lines - Briwax will blend every time!

If your piece is smooth and relatively clean, apply Briwax with a soft cloth - a small terry cloth towel works very well. Using the soft cloth, pick up a SMALL amount of Briwax. As the British would say, "use it sparingly". Now, spread the Briwax onto your furniture as far as it will go - you'll notice that the areas where Briwax has been applied will be dull.

You'll want to rub to get Briwax into the pores / cracks / crevasses of the piece. You can apply Briwax in a circular motion, but always finish with the grain. Allow the Briwax to dry - usually within minutes. Now, with a clean, fresh cloth, buff the area. You should see a lovely sheen.

Now, move to the next section of the piece and repeat the process. If you don't achieve the sheen you desire with the first application of Briwax, repeat it. The solvent that is in Briwax will dissolve the previous application - you'll never have wax build-up!

If your piece is excessively dirty or has rough spots, you can apply Briwax using #0000 steel wool. Simply get a small piece of steel wool, pick up Briwax with the steel wool and rub Briwax into the piece. Don't apply a lot of pressure, let Briwax work for you. The solvent in the product will clean the dirt off of the piece. Briwax likes a rough surface and needs something to hold on to!!

Remember . . .

  1. Use Briwax sparingly - a little goes a long way. For example, a 6 foot dining table top will require only about one tablespoon of Briwax!!!
  2. You'll never have lap marks.
  3. If you can't achieve a sheen, you have too much Briwax on your piece. But, remember, Briwax removes the previous application - and as strange as it may sound, apply more Briwax (sparingly) to remove the excess wax.

The Green Plastic Lid That Came on My Can of Briwax

briwax-can

The Briwax you purchased, more than likely, came with a GREEN plastic lid. This plastic lid is designed for physically stabilizing the product during shipping and for ease of stacking at your neighborhood retailer.

Once you open the can of Briwax, discard the GREEN plastic lid and RETAIN and use the METAL LID for storing your Briwax. The metal lid will keep your Briwax ready to use on your newly acquired antique or your next woodworking project.

But remember, as you work with your Briwax, do not leave the metal lid off for long periods of time -- the solvent will evaporate and you'll be left with a hard piece of almost unusable wax. Also, at the end of the day, make sure that the metal lid is securely in place on the can!


My Briwax is liquid, what do I do now?

Briwax will turn into a liquid in hot weather. This in no way diminishes the quality of the product. In fact, Briwax is designed to turn liquid and can be used in a liquid state (see Using Briwax in a Liquid State on this blog).

Simply allow the container to come to room temperature - either by placing the container in the refrigerator for several hours, or by bringing the container into an air conditioned room - and Briwax will return to a paste form.

In warm weather, you might want to place the container of Briwax in an air conditioned room the night before you plan on using it. The container can be placed in the refrigerator to speed up the process.

Since Briwax is to be applied sparingly, the paste form of the wax will allow a less wasteful application.

Just remember, the quality of your Briwax is just fine - either in a liquid state or paste form!!

Briwax is Available in Two Formulas

Original vs. Toluene Free

The Briwax Original formula contains the solvent Toluene and the Toluene Free formula contains the solvents Xylene and Naphtha. Solvents are necessary in the formulation of Briwax because without them Briwax would just be a hard chunk of wax, almost unusable.

Toluene has a high aroma factor, a strong smell, and some people love it and some hate it. The Toluene Free formula has a much lower aroma; it smells more like a dry cleaning solvent.

briwax-cans

Briwax Original uses toluene mainly because it dissolves the beeswax 100%. So even if Briwax is liquid it will still work as intended. Toluene is also an excellent grease and grime cleaner. As Briwax is used on old antique pieces, the solvent is really at work cleaning off the old oxidized surface. Toluene is an ingredient in ink, so if you ever have a problem with an ink stain, Briwax can help...actually it will be the solvent removing the stain. Toluene is also a very fast evaporator. In most applications, the solvent will evaporate in less than a minute. This is a fact of solvents that the faster they evaporate the stronger the smell.

The Briwax toluene-free formula is a blend of Xylene and Naphtha. This formula will take the solvents longer to evaporate, approximately 15-20 minutes, and the aroma will decrease or not smell as much. Also this formula will not dissolve all the waxes 100%, so if using in the middle of a hot summer you should cool the wax first.

The beeswax that is used in Briwax comes from Australia and New Zealand and is of the highest quality. The Carnauba wax that is used only comes from South America. This wax is scrapped from the leaves of certain palm trees and is refined to be an extremely hard wax. The blending of these two waxes is what gives Briwax it museum quality shine. The softer beeswax is the preservative and the harder carnauba wax is the shine.

Using Briwax on Wood Floors

Wood... one of man's oldest natural resources is also one of our most revered resources. It has, among other things, provided food, shelter, tools and hardwood floors that in some cases have lasted for hundreds of years. Other floor coverings simply cannot compete with the durability, beauty and characteristics of wood.

Unlike other floor coverings wood is very forgiving when it comes to taking abuse. Most problems can be prevented or minimized by keeping floors waxed and by wiping up liquid spills immediately. When a wood floor appears dirty and nasty, a rewaxing is usually all that is required to restore its natural beauty.

floor_1950

Common Problems and Their Remedies . . .

Read the complete Floor Care Guide


Briwax is Available in Clear and 9 Wood Tone Colors

Briwax comes in Clear as well as nine wood tones -- Light Brown, Dark Brown, Antique Mahogany (Cherry), Golden Oak, Tudor Brown, Dark Oak, Teak, Rustic Pine, and Ebony (black). Take a look at the color chart below to see how the colors compare with each other.


Clear is the perfect choice when you don't want to impart any color onto the wood. Clear Briwax has absolutely no color and will not yellow. Of course, with that said, Clear Briwax will not hide or diminish any scratches on the wood.

Light Brown is the most versatile of all of the colors - it takes on the color of the wood on which it is used.

Golden Oak has yellow undertones. It compliments beautifully the red tones of Heart Pine.

Antique Mahogany can also be called Cherry. It has a hint of red and is beautiful on Cherry or Mahogany woods - brings out the red tones of the wood. Try Antique Mahogany on Red Oak floors to highlight the red tones.

Dark Brown is a deep, rich brown. It is widely used on Walnut to enhance its rich, dark color.


Agine Pine


Looking to make new pine look old? Read the complete Aging Pine article. You'll be able to easily make the honey colored English/Irish pine look using new pine boards, sodium hydroxide and Briwax.

You can create looks like this:


Entertainment Center photo compliments of Nottingham Antiques, Atlanta, GA

Read the Complete Aging Pine Article

Using Briwax in a Liquid State

Briwax is designed to melt at 85°F. Use in the liquid state to get the wax deep into cracks, crevices, carvings, etc.

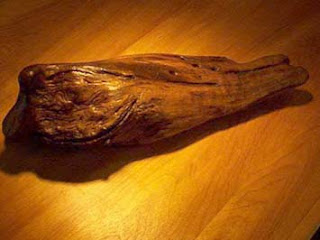
This piece of driftwood was found on the beach. How can you preserve this piece properly?


Using Briwax in a liquid state, the wax can be poured into the deep recesses to fully preserve the piece. You can use Briwax in either a liquid or a solid state. You will achieve professional results in either mode.

Briwax Can Be Used On Ceramics

An unglazed ceramic piece can be given a new look by waxing the piece with Briwax. Is the piece dull and you would like more sheen? Want to create an aged look? Look at these ceramic pumpkins in the picture below. All of the pumpkins looked dull, like the one in the foreground. The pumpkins in the group were waxed with Golden Oak Briwax - check out their sheen and enhanced color -- they almost look real!!

How to Achieve a Sheen Using Briwax

If you looked at a cross-section of your wood after it has been sanded, under a microscope, the top surface would look much like this:

VVVVVVVVVVVVVVVVVVVVVVVVVVVVVVVVVVVVVVVVVVVVVVV

The pores of the wood look much like "peaks" and "valleys". You cannot see this with the human eye after sanding with 180 grit. In order to achieve a sheen with Briwax, you must first fill the pores or the "valleys" with Briwax.

On soft woods, such as pine, the pores of the wood are large. Generally three or four applications of Briwax are necessary to completely fill the pores and develop a beautiful hand rubbed luster on raw pine. Pine wood that has already been stained or finished will develop a sheen more quickly.

On hard woods -- maple, oak, birch, etc. -- the pores are quite small. The hand rubbed luster can easily be achieved with one or two applications of Briwax.

Remember these key elements in applying Briwax:

1. Use Briwax sparingly -- a little goes a long way
2. Always buff after each application of Briwax
3. If the wax smudges, you've used too much Briwax.